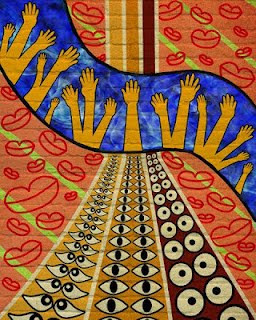
Artwork title: United
Art movement: Street art
Reference artist: Above
Theme chosen: Society and cultural
Art movement: Street art
Reference artist: Above
Theme chosen: Society and cultural
Idea & concept:
To show that we all are human who born in different ways, though we possess the same feature, we have eyes, mouth, hands, and so on. Therefore, we deserve the equal rights, regardless on our skin colour, size, shape, etc. I've put hands as main focus. The pose of those hands is trying to bring out the idea of "Helping Hand", as I think to lend a helping hand can provide a mutual support for each other, thus, is important for our society.
To show that we all are human who born in different ways, though we possess the same feature, we have eyes, mouth, hands, and so on. Therefore, we deserve the equal rights, regardless on our skin colour, size, shape, etc. I've put hands as main focus. The pose of those hands is trying to bring out the idea of "Helping Hand", as I think to lend a helping hand can provide a mutual support for each other, thus, is important for our society.

Artwork title: Natural Face
Art movement: Street art
Reference artist: Above
Theme chosen: Society and cultural
Idea & concept:
Plastic surgery has become trend for this era. Everyone wants to have a pretty face. However, people forgot that god creates us in our own unique way. People started to copy celebrities faces and so. This also show that mostly people's perspective on "Beauty" is based on the outer, instead of looking at the inner side.

Artwork title: Fast falling
Art movement: Street art
Reference artist: Above
Theme chosen: Social and cultural
Idea & concept:
Nowadays, people who lives in the city, they forced to follow the fast pace in order to survive. Gradually, people are slowly erode by the hectic city lifestyle; thus, all the bodies are pressed by the heavy buildings. While the buildings on the bodies represent the suffocate and busy city lifestyles. Besides that, the overlay of money behind the buildings is trying to show that earning money is what mostly people stressed for. I've also chose for few main cities such as new york, bei jing, london, kuala lumpur and taipei to bring out the ideas of city lives. Though, there are more cities around the world, so the background I have drawn the falling body shadows.


